Netstumbler:
For a Swiss Army knife of wireless network diagnostics, “NetStumbler” is saddled with a somewhat unfortunate name. Although it implies a sort of blind luck, NetStumbler is actually most useful for pinpointing details of a wireless network, helping you configure, secure, optimize and discover.
NetStumbler calls itself “beggarware,” meaning that it is free (but not open source), although they request a $50 donation from commercial and government users. The latest version (0.4.0 as of this writing) is available for download from netstumbler.com and stumbler dot net.
The Right Hardware for the Job
Requiring Windows 2000, XP or newer, NetStumbler functions best with a supported wireless card. Determining precisely which cards are fully supported can take some sleuthing.
NetStumbler fully supports cards based on the Proxim 8410-WD and 8420-WD, which have most commonly been sold under the names Orinoco Classic Gold and Orinoco Gold. Other cards based around this chipset include the Dell TrueMobile 1150, Compaq WL110, and Avaya Wireless 802.11b PC Card. Also supported are cards based on the Intersil (now owned by Conexant) Prism and Prism2 wireless chipsets, such as the popular D-Link DWL-650. Unfortunately, there is no single comprehensive source of information on wireless card chipsets and retail models. Seattle Wireless maintains a wiki, and NetStumbler hosts user-submitted compatibility reports, although they do not indicate which chipset a card uses.
Wireless cards which are fully supported in NetStumbler are able to report accurate noise and signal strength levels. The latest 0.4 version of NetStumbler partially supports most wireless cards, but those without full support will not be reliable for noise and strength readings, and may cause instability in NetStumbler itself.
Getting Off the Ground
NetStumbler and Windows Wireless Zero Configuration service do not play well together. The 0.4 version of NetStumbler includes a feature called “Auto Reconfigure” which you can enable by clicking the “two gears” icon on the toolbar or through the View, Options menu. With Auto Reconfigure enabled, NetStumbler will make an effort to stop the WZC service upon launching, and restore it upon exit. Alternatively, you can take control of the situation by enabling and disabling WZC yourself (Windows Control Panel, Administrative Tools, Services, Wireless Zero Configuration).
Some wireless cards will not see all available access points unless their SSID is set to blank or “ANY.” Again, NetStumbler with Auto Reconfigure enabled will attempt to set your wireless card accordingly while running.
When NetStumbler launches, you may see two entries for your wireless card under the Device menu. The first entry includes the chipset name for your card (such as “Prism2”), whereas the second reads “NDIS.”
Which to use? The easiest way to tell is to run NetStumbler within reach of a known functioning access point. Choose the first device entry and see if the AP shows up in NetStumbler’s window. If yes, your card is fully supported by NetStumbler. Do not use the NDIS device.
If the first device entry does not detect the AP in a few seconds, try the NDIS entry. If this works, your card is partially supported, and will not return reliable data for noise and signal strength. You can continue to use NetStumbler’s other features in NDIS mode.
If neither device driver detects the AP, try using your wireless card’s management utility to manually set its SSID to blank or “ANY”. If none of these combinations detect the AP under NetStumbler, you may have a funky wireless card which cannot be used with NetStumbler.
Finding Access Points
While running NetStumbler, the right-hand pane shows APs currently detected and available under the current view filter. By default, you have no view filter set, so all detected APs are displayed.
Each AP listing is marked with a colored dot indicating the signal strength to that access point, alongside its MAC address, the unique identifier assigned to each network device. The colors range from red (signal too low) to yellow (marginal) to green (good). A grey dot marks an AP which had been detected but is now gone. A lock appears on the dot icon when the AP is operating with encryption enabled.
For many NetStumbler users, detecting available APs is the software’s primary feature. Typically, the software is run on a mobile computer, which you either carry to some location or drive around with in the car, scanning the air for detected access points. The practice of hunting for access points has come to be known as “war-driving,” another unfortunate term, since detecting APs alone is not itself an aggressive or malicious act.
To clear the record, NetStumbler does not connect you to available access points. While NetStumbler can detect them, you still need to rely on either Windows or your wireless card’s management software to join a wireless network. Since your connection software also displays available networks, you may wonder, why bother with NetStumbler?
NetStumbler may better disambiguate access points which share an SSID, for one example. But more often, NetStumbler can continuously scan for access points as you roam about an area, presenting a convenient log of its activity, including audio notification. This functionality is typically not available from Windows’ or vendor-provided wireless client software.
Exploring Access Points
The left pane of NetStumbler is an Explorer-like interface for navigating available wireless access points. Under the “Channels” heading, you will find all detected access points listed under their channel frequencies. Under “SSIDs,” you will find all detected access points sorted by their network name. You may find two or more APs listed under the same SSID. This could indicate two separate wireless networks overlapping in range, which could cause problems for clients. Alternatively, it may indicate one wireless network with multiple APs available from your current location.
In cases where you find multiple APs sharing the same SSID, look at the “Subnet” field in the right pane. Here you will see which IP network the APs are operating on.
Signal-to-Noise Graphs
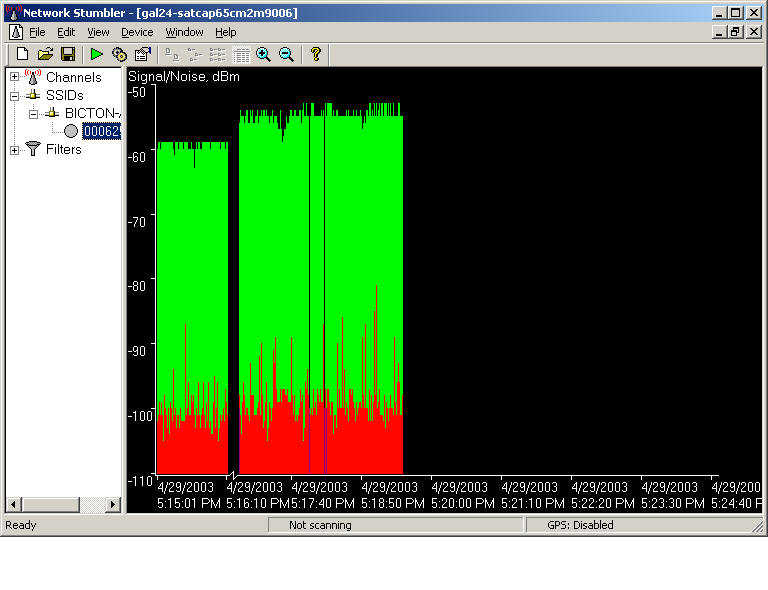
 Clicking on an AP’s MAC address in the left pane will replace the right pane with a live signal-to-noise graph. Note that this graph is accurate only if your network card is fully supported by NetStumbler. Signal-to-noise readings can be a powerful tool for troubleshooting your network and optimizing AP or antenna placement.
The graph overlays two sets of values – signal strength (green) and noise (red), measured in dBm. The “taller” your green plot, the stronger your signal; likewise, the taller your red plot, the more noise is present. For the best wireless performance, you want to maximize your signal and minimize your noise. Typical sources of noise in the Wi-Fi 2.4GHz range include microwave ovens, cordless phones, wireless video transmitters, and perhaps neighboring wireless networks. You can also observe the consistency of your graph to determine the presence of sources of intermittent interference.
Partially supported network cards will produce signal strength (green) plots which may or may not be accurate, along with no noise (red) plots.
Access Point Filters
The “Filters” item in the left pane expands to a list of criteria for filtering the right pane list of available access points. If you click the “Encryption Off” filter, only open APs will be listed on the right. Some of the filters are quite technical, and are only useful in specialized situations. One thing to keep in mind – if you’re not seeing an AP on the right that you know is available, check that you have not selected a filter which may exclude it from appearing.
Mobile Tracking with GPS
If your NetStumbling PC sports an attached GPS receiver, you can enable GPS support in NetStumbler to track the location of detected APs. Use the View, Options, GPS menu to configure your receiver. NetStumbler will fill in the latitude and longitude fields in the right pane, and will record GPS data in logs that you can output through the File, Export menu.
Extending NetStumbler
NetStumbler exposes a small library of functions which can be accessed through active scripting languages under Windows, including VBScript, JScript, and ActiveState’s PerlScript and Python. You can connect NetStumbler to external scripts through the View, Options, Scripting menu.
One popular approach to scripting connects NetStumbler events to text-to-speech output, particularly valuable for so-called “war-driving.” More details are available in the NetStumbler support forum.
Further Support
NetStumbler is supported through its online community. There are FAQs and newbie forums that veteran NetStumblers would strongly prefer you read. For whatever reason, NetStumblers are not the most welcoming of online communities, often handling newcomers’ questions with short, world-weary replies. But the support is free, and you don’t have to be roommates with them.
Kismet:
While NetStumbler is the most popular tool of its kind for Windows machines, users of Linux, BSD and Mac OS X have Kismet, a roughly analogous – though some would say more thorough – utility for discovering wireless networks.
Kismet detects the presence of wireless networks, including those with hidden SSIDs. It can discover and report the IP range used for a particular wireless network, as well as its signal and noise levels. Kismet can also capture or “sniff” all network management data packets for an available wireless network. You can use Kismet to locate available wireless networks, troubleshoot wireless networks, optimize signal strength for access points and clients, and detect network intrusions.
While NetStumbler and Kismet run on different platforms, many people have access to both, which often leads to comparisons between the two.
Passive vs. Active Sniffers
Kismet is a passive sniffer. Unlike NetStumbler, which broadcasts a request for access points responding to the SSID name “ANY,” Kismet does not send any packets at all. Instead, Kismet works by putting the wireless client adapter into RF monitor mode. While in so-called “rfmon” mode, the wireless client is not (and cannot be) associated with any access point. Instead, it listens to all wireless traffic. Consequently, your wireless card cannot maintain a functional network connection while under Kismet control.
Users often report that Kismet finds more APs than NetStumbler. This is because NetStumbler only knows about access points that respond to its “ANY” SSID probe request. Some network administrators configure their APs not to broadcast, or to “hide” their SSID. These do not respond to NetStumbler’s probe. Because the AP blanks out its SSID, Kismet will detect its presence, but without a network name. However, when a legitimate client associates with that AP, its real SSID is included in the initial handshake. Because Kismet sees all network management traffic, it will pick up these packets and discover the SSID which was supposedly “hidden.”
Supported Hardware
Whereas NetStumbler can provide at least some functionality with any wireless card supported by OS drivers, Kismet functions only with network cards with drivers that support RF monitoring mode. In general, this includes wireless cards based on the PRISM 2, 2.5, 3, and GT chipsets; older ORiNOCO cards without the HermesII chipset, such as the Orinoco Gold; and Atheros a/b/g chipsets.
In practice, there are dozens of wireless cards on the market, and it is not always obvious whether there are supported drivers available. Some of the more popular supported wireless adapters include the ORiNOCO Gold, the original Apple Airport (not Extreme) card, and Intel Centrino.
To further complicate things, drivers available for one platform, such as Linux, may not be available for another, such as OS X, even though Kismet itself is available for both. In general, Linux has the most supported drivers for Kismet.
The Kismet Web site hosts a forum for discussion and questions about supported cards and driver availability.
Installing
Kismet is licensed under the GNU General Public License. It is officially distributed as a source package which you can compile for a variety of platforms, from Linux to OS X to BSD, if you’re into that kind of thing.
The Kismet Web site also distributes pre-compiled binaries for Arm and MIPS platforms. These binaries allow you to run Kismet on small devices like the Sharp Zaurus Sl-6000L (using the Arm binary) or the venerable Linksys WRT54G router (using the MIPS binary).
Apple users can download pre-compiled Kismet for OS X from the KisMACsite, which includes a slick Aqua GUI.
Linux users who do not want to compile Kismet from source should check the repositories for their distribution. For example, on my Ubuntu Linuxsystem, I simply launched the Synaptic Package Manager and searched for “kismet,” which brought up a point-and-click install.
Although Kismet uses a text-based interface, a window-based GUI calledGKismet is available for Linux with Gnome libraries installed.
Configuring
Kismet is designed with a client/server architecture. While most users run both the client and server on the same machine and simply use Kismet as a local application, you can also run Kismet clients on remote systems. This way, one or more remote machines can see real-time data from the machine hosting the Kismet server.
In a typical Linux install, the Kismet configuration files are found in /etc/kismet. Depending on your platform or distribution, this location may vary.
Before you can run Kismet for the first time, you may need to edit the primary configuration file, kismet.conf.
Inside, you will find the line:
suiduser=your_username_here
The conventional wisdom is that you should set the above to a local user under which you’ll run Kismet. My experience in Ubuntu 5.10, using the Kismet package provided by Ubuntu, was that I could only run Kismet successfully as root. Attempts to run as a normal user did not work, and aborted due to various fatal errors. But this may vary on other platforms.
You also need to tell Kismet which “source,” or wireless adapter, to use. The basic syntax used in kismet.conf is:
source=type,interface,name
On my Ubuntu system with an Atheros-based Netgear WG511T card, my source configuration looks like this:
source=madwifi_ag,ath0,madwifi
Some alternative source lines for other cards include:
source=madwifi_b,ath0,madwifi
source=orinco,eth1,Orinoco
source=prism,wlan0,hostap
source=viha,en1,AirPort
Where do these parameters come from? The Kismet documentationcontains a section called “Capture Sources,” which includes a chart that lists the type and interface parameters for every supported chipset. The third parameter, name, can be set to anything you like for logging purposes.
Running Kismet
Unless you install a window-based GUI for Kismet such as KisMAC or GKismet, this is a text-based application. On my Linux system, I open a terminal window and launch Kismet as root:
sudo kismet
As previously stated, my Ubuntu installation does not like running kismet as a normal local user. Depending on your platform, you may be able to launch kismet without the “sudo,” assuming you have configured kismet.conf appropriately.

Kismet shows the list of detected wireless networks. They are initially sorted in “Autofit” mode, which does not present the networks in a specific order. Press “s” to bring up the sort menu, where you can order the SSID’s by name, chronology, and other criteria.

You can press “h” in Kismet to pop a chart of key commands. With the network names sorted, you can use the up/down arrow keys to navigate through the list. Press “i” on a network to see a detailed view of that particular network.

Press the “l” key in Kismet to pop up signal strength data.

The wireless card power window is especially useful in troubleshooting wireless connections for source of noise, or optimizing locations of access points for maximizing signal strength within a space.
Further Fun
If you have a serial-based GPS receiver connected to a Kismet server, you can log and even map detected access points. You’ll need GPSD, if it's not already installed, to provide communications between the receiver and Kismet.
Kismet can play and/or speak audible alerts, which is particularly helpful when detecting wireless networks from a moving vehicle. In the kismet.conf file, you can configure .wav format sounds for alerts, including new network detection, new WEP network, new network traffic, junk traffic, GPS lock and lost.
Using the text-to-speech software Festival, Kismet can also speak its findings using customizable templates available in kismet.conf.
Thanks to Aaron Weiss from WiFi-Planet